Managing Your Payments
The Payments page is your central hub for funding your ASI:Cloud account, reviewing past transactions, and downloading receipts. The same balance is used for all workloads on the platform: virtual machines, GPU compute, and serverless inference.
The page has two tabs:
- Add funds: top up your balance with card or crypto.
- Payment history: view, inspect and download receipts for past transactions.
You can reach the page from the Add balance entry in the left navigation, the Top up button on the Dashboard, or directly inside any payment-required flow (e.g. the final step of Creating a Virtual Machine).
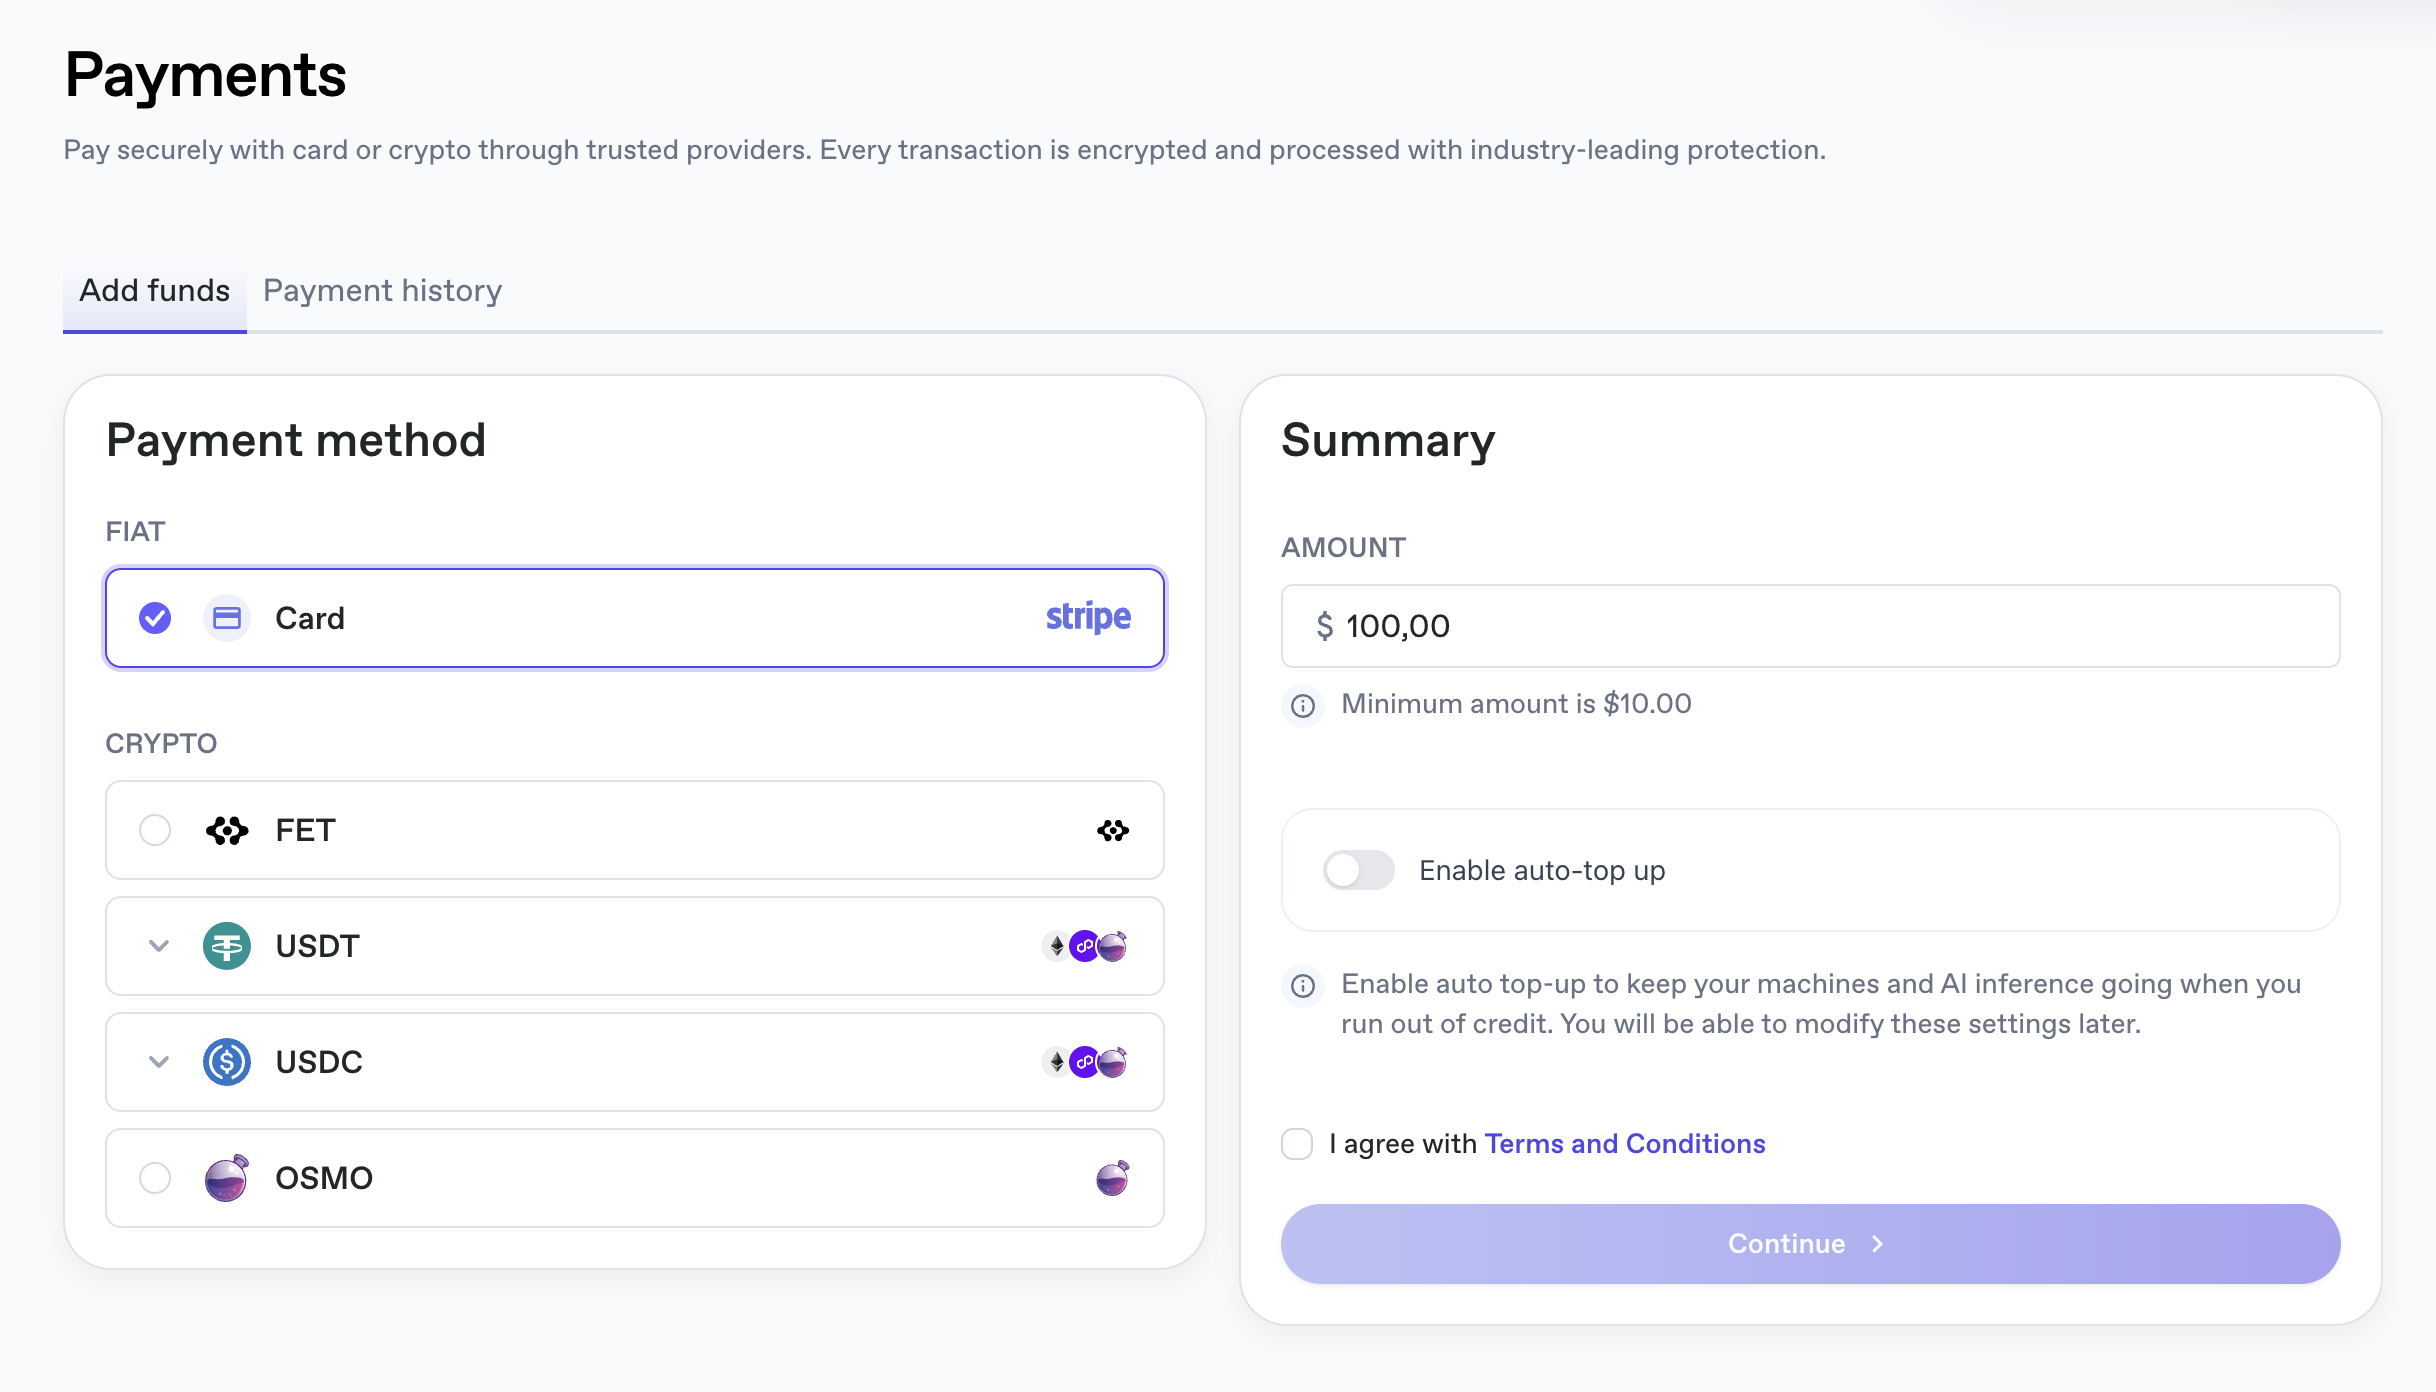
Add funds
The Payment method panel on the left lists every supported method, grouped into FIAT and CRYPTO. The Summary panel on the right updates based on the method you select.
FIAT: Card (Stripe)
Pay by debit or credit card via Stripe.
- Select Card under FIAT.
- Enter the USD Amount to add to your balance. The minimum top-up is $10.00.
- (Optional) Toggle Enable auto-top up and configure the rules below. See Auto-top up for the full breakdown.
- Tick I agree with Terms and Conditions and click Continue.
- The right panel switches to a Stripe-hosted Checkout with a Back to summary link.
- Pick a presentation currency. When a non-USD currency is shown, the exchange rate is displayed underneath.
- Pay with a saved Link account or click Pay without Link to enter card details manually.
- On success the funds are credited to your USD balance immediately.
Auto-top up
Auto-top up keeps your machines and AI inference going automatically when your balance runs low. It is recommended for long-lived workloads, since it prevents VMs from being terminated and inference requests from being throttled when the balance hits zero.
When you toggle Enable auto-top up in the Summary panel, three controls appear:
| Control | What it does |
|---|---|
| When balance falls below $X top up with: | The trigger threshold: once your balance dips below this value, an auto-top-up runs. Pick a preset (50 / 250) or enter a Custom amount for the threshold. |
| Top up amount | The USD amount that's charged each time the threshold is hit. |
| Maximum monthly top up amount | A safety cap on total auto-top-up spend per calendar month. Pick 1000 / 5000 or set a custom value. Once the cap is reached, auto-top-up pauses for the rest of the month. |
Auto-top-up uses the card you complete the initial top-up with. You can change or disable it later. See Managing auto-top up below.
Managing auto-top up
Once auto-top up is enabled, an extra Top up tab appears alongside Add funds and Payment history on the Payments page. From there you can:
- Adjust the trigger threshold, top-up amount, and monthly cap.
- Switch the card on file.
- Disable auto-top up: turning it off removes the tab until you re-enable it during a future top-up.
CRYPTO
ASI:Cloud accepts the following tokens, each on multiple chains where applicable:
| Token | Chains |
|---|---|
| FET | Fetch.ai mainnet |
| USDT | Ethereum, Polygon Mainnet, Osmosis Mainnet |
| USDC | Ethereum, Polygon Mainnet, Osmosis Mainnet |
| OSMO | Osmosis Mainnet |
Click any token row to expand it and pick the chain you want to pay on. For an authoritative list of supported networks see the Chains and Currencies page.
Step 1: Choose a token and amount
- Pick the token (and chain, if applicable) under CRYPTO.
- Enter the Predicted USD credit. This is the USD amount you want added to your balance. The minimum varies by token (for example, $5.00 for FET).
- The Summary shows the equivalent token amount, e.g.
51.15312… FET, and a notice such as:"Estimated based on the current exchange rate of 0.1954914948929529 FET per USD. The rate may change before the payment is completed, and you may get more or less than predicted."
- Tick I agree with Terms and Conditions and click Continue.
Step 2: Select a wallet
The right panel pins your selection (e.g. USDT Ethereum) with a Change link, and the left panel switches to Select wallet.
| Wallet | Notes |
|---|---|
| MetaMask | Detected automatically when the browser extension is installed. EVM chains. |
| WalletConnect | Use any WalletConnect-compatible mobile wallet. |
(Cosmos-ecosystem chains such as Osmosis Mainnet and Fetch.ai use Keplr/Leap; the wallet picker presents the appropriate options for the chain you chose in step 1.)
The Summary repeats:
"We'll convert this price from USD to your selected crypto at our current rate when you confirm the transaction."
…and shows the final Total in USD.
Step 3: Approve in the wallet
After clicking the wallet, you'll see a Continue in [WalletName] prompt while the connection request is sent to your extension or mobile app. Approve the connection, then approve the actual transfer transaction.
Once the transaction is confirmed on the source chain, the equivalent USD amount lands in your ASI:Cloud balance.
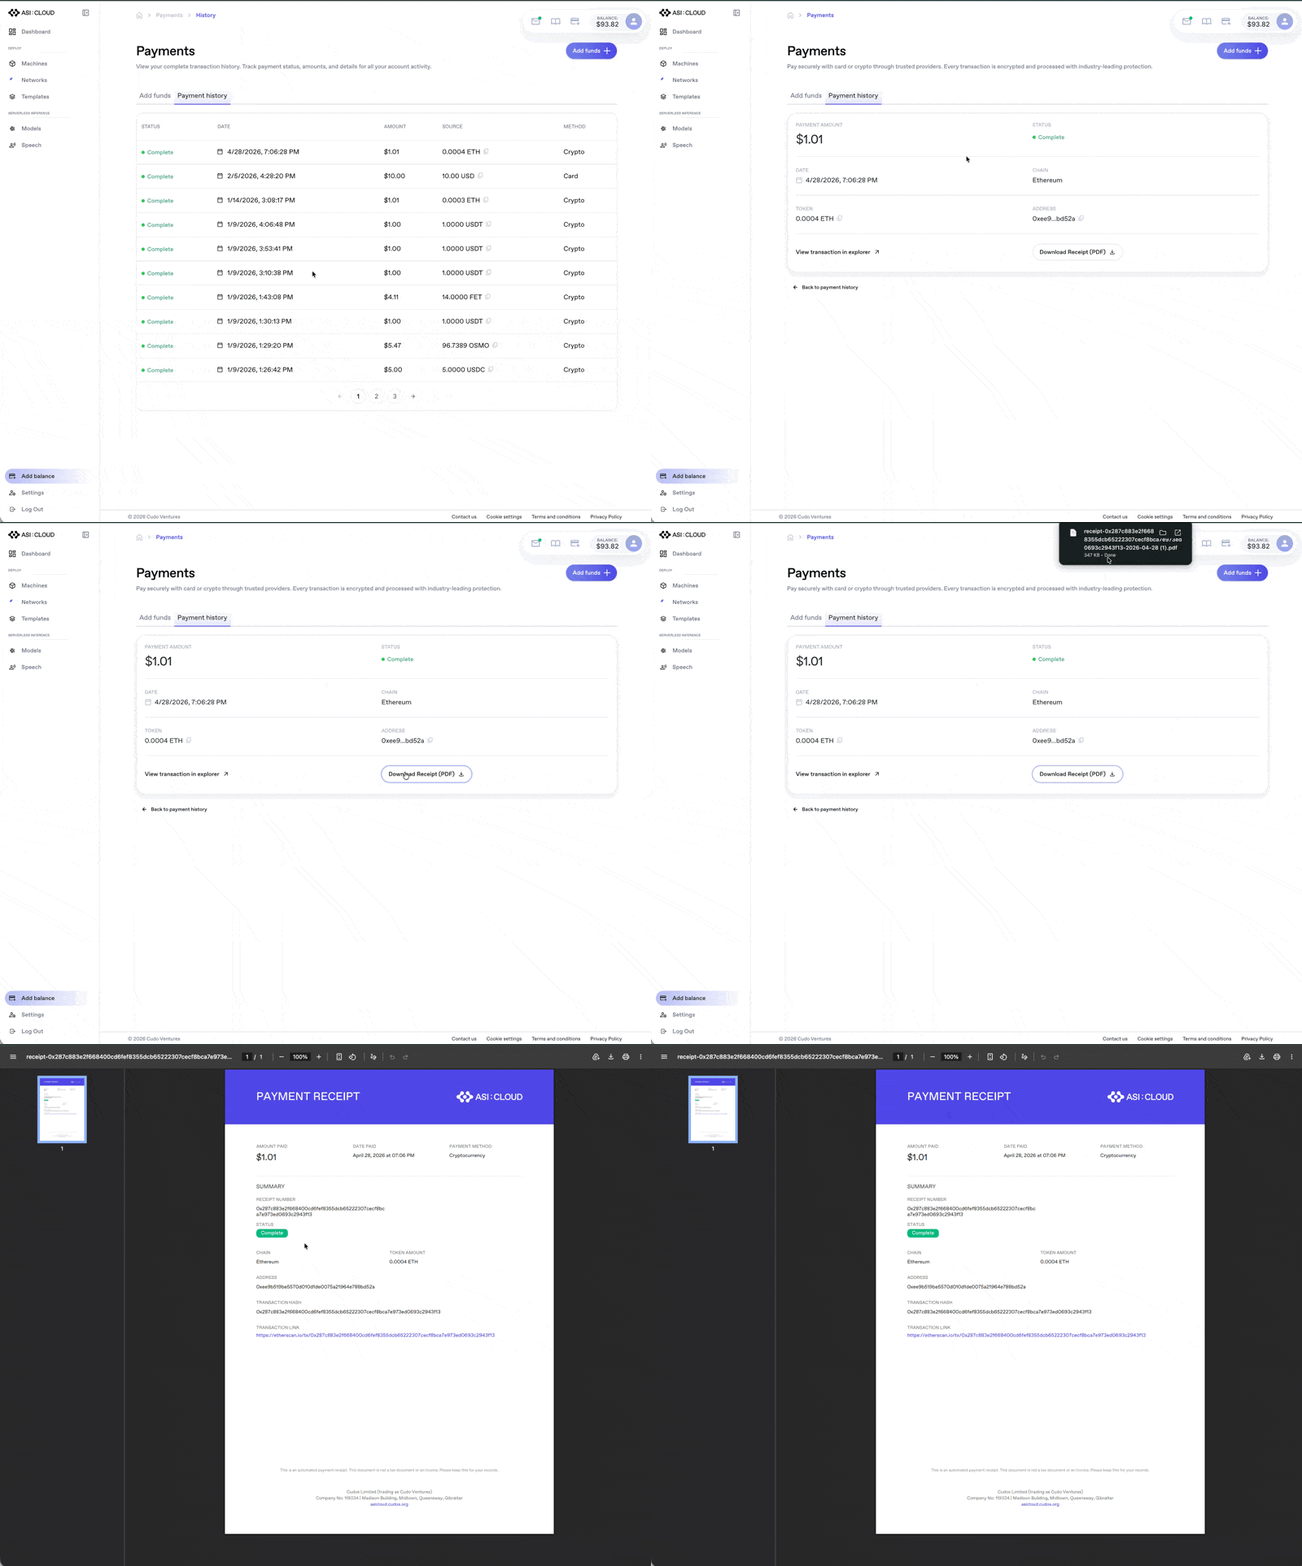
Payment history
Switch to the Payment history tab for a full audit trail of every top-up.
The list view shows:
| Column | Notes |
|---|---|
| Status | Complete, plus other statuses for in-flight transactions. |
| Date | Local date and time. |
| Amount | USD value credited. |
| Source | Original token amount (e.g. 0.0004 ETH, 1.0000 USDT, 14.0000 FET) or 10.00 USD for card payments. A copy icon next to the source copies the value. |
| Method | Crypto or Card. |
Use the page numbers at the bottom to navigate, and the Add funds + button at the top right to jump back to the funding flow.
Transaction details
Click any row to open the transaction detail view, which shows:
- Payment amount in USD.
- Status (e.g.
Complete). - Date and time.
- For crypto: Chain, Token amount and Address (with copy icons).
- A View transaction in explorer link that opens the source chain's block explorer (e.g. Etherscan).
- A Download Receipt (PDF) button.
A Back to payment history link returns you to the list.
PDF receipts
Each completed payment can be downloaded as a PDF receipt. The receipt includes:
- Amount paid, Date paid, Payment method (e.g. Cryptocurrency).
- Receipt number (the on-chain transaction hash for crypto payments).
- Status badge.
- For crypto: Chain, Token amount, Address, Transaction hash, and a Transaction link to the public block explorer.
The downloadable receipt is an automated payment receipt, not a tax document or an invoice. Keep it for your records, but use your own accounting workflow if you need a formal invoice.
Important notes
- Ensure sufficient balance for both transfer and fees.
- More complex routes may take longer and cost more.
- Network congestion may increase fees and transaction times.
Support and troubleshooting
If you encounter issues, visit our support channel for assistance.