Creating a Virtual Machine
To reach the VM creation page, navigate to the Machines page in the DEPLOY section of the left navigation, then click Create new machine in the top right.
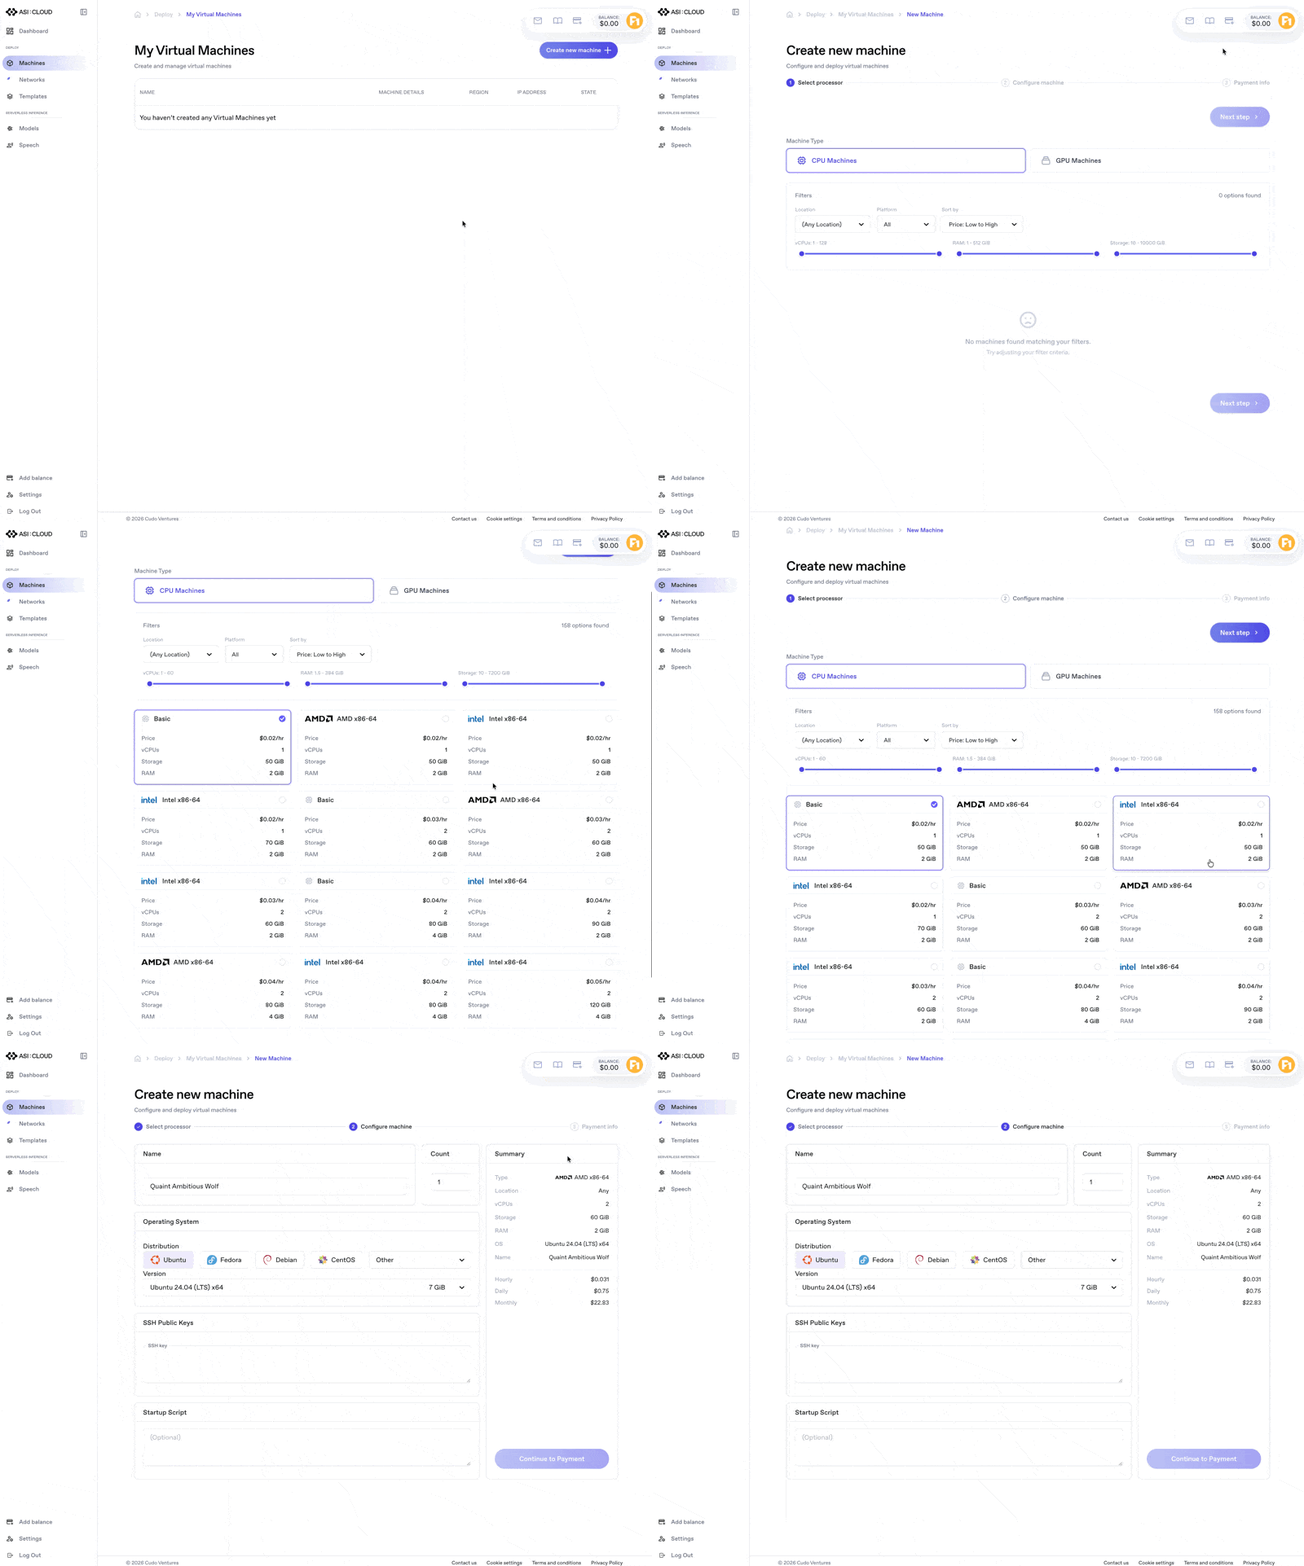
The wizard walks you through three steps: Select processor → Configure machine → Payment info. Your selections are summarised on the right of every step, and a live price preview (hourly / daily / monthly) is shown before you pay.
You don't need to fund your account before starting the wizard. If your balance is insufficient at the final step, you can pay with a card (Stripe) or crypto inline.
Step 1: Select processor
Choose the type of machine you want to deploy.
Machine Type
At the top of the step, switch between:
- CPU Machines: general-purpose virtual machines on AMD or Intel x86-64.
- GPU Machines: NVIDIA-accelerated instances for training and inference workloads.
Filters
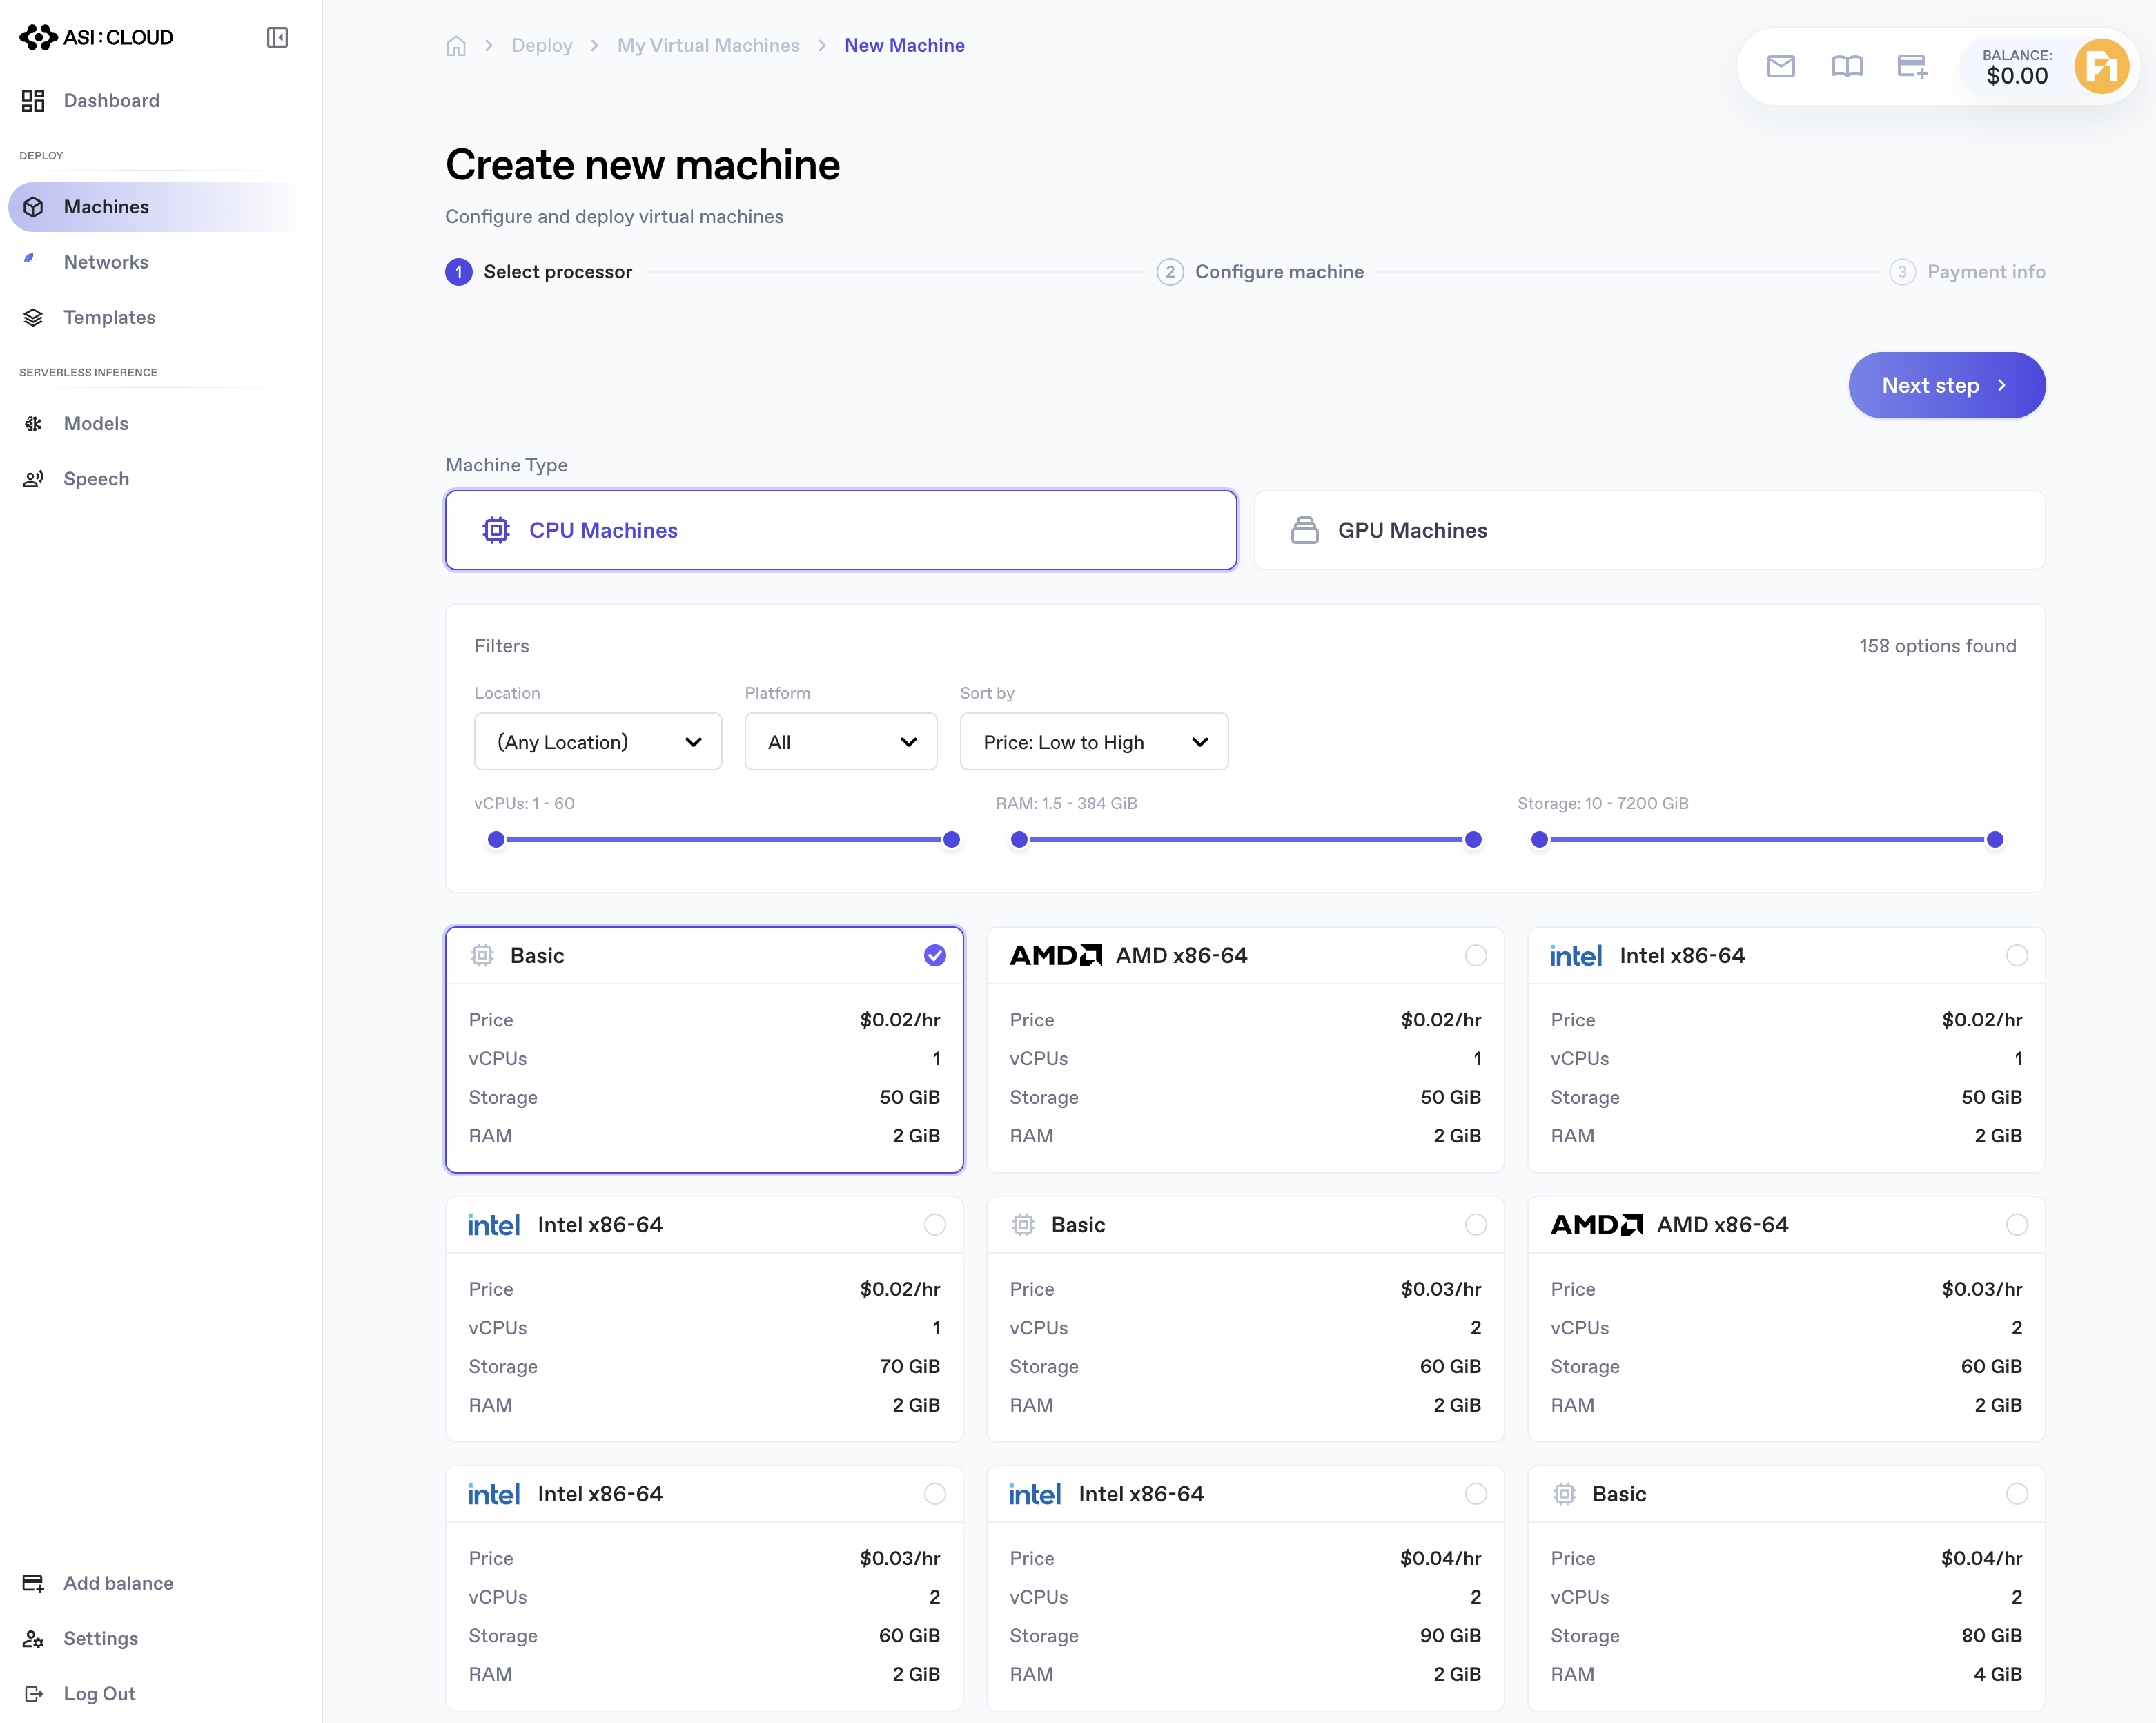
Use the filter bar to narrow the catalogue (the page shows the number of matching SKUs, typically 150+ across both tabs):
| Filter | Options |
|---|---|
| Location | Any Location, plus per-region datacenters (e.g. Amsterdam 3, Atlanta 1, Bangalore 1, Frankfurt 1, London 1, …). |
| Platform | All / Intel / AMD (CPU tab). |
| Sort by | Price: Low to High (default), Price: High to Low. |
| vCPUs | Range slider, 1–60. |
| RAM | Range slider, 1.5–384 GiB. |
| Storage | Range slider, 10–7,200 GiB. |
Picking a SKU
Each card shows the hourly price along with the vCPU, storage and RAM allocation. For example, on the CPU tab:
| Platform | Price | vCPUs | Storage | RAM |
|---|---|---|---|---|
| Basic | $0.02/hr | 1 | 50 GiB | 2 GiB |
| Intel x86-64 | $0.02/hr | 1 | 50 GiB | 2 GiB |
| AMD x86-64 | $0.02/hr | 1 | 50 GiB | 2 GiB |
| Basic | $0.03/hr | 2 | 60 GiB | 2 GiB |
Click a card to select it, then Next step.
Pricing is metered hourly regardless of the duration you pick later. The hourly rate shown on the card is the rate you'll pay.
Step 2: Configure machine
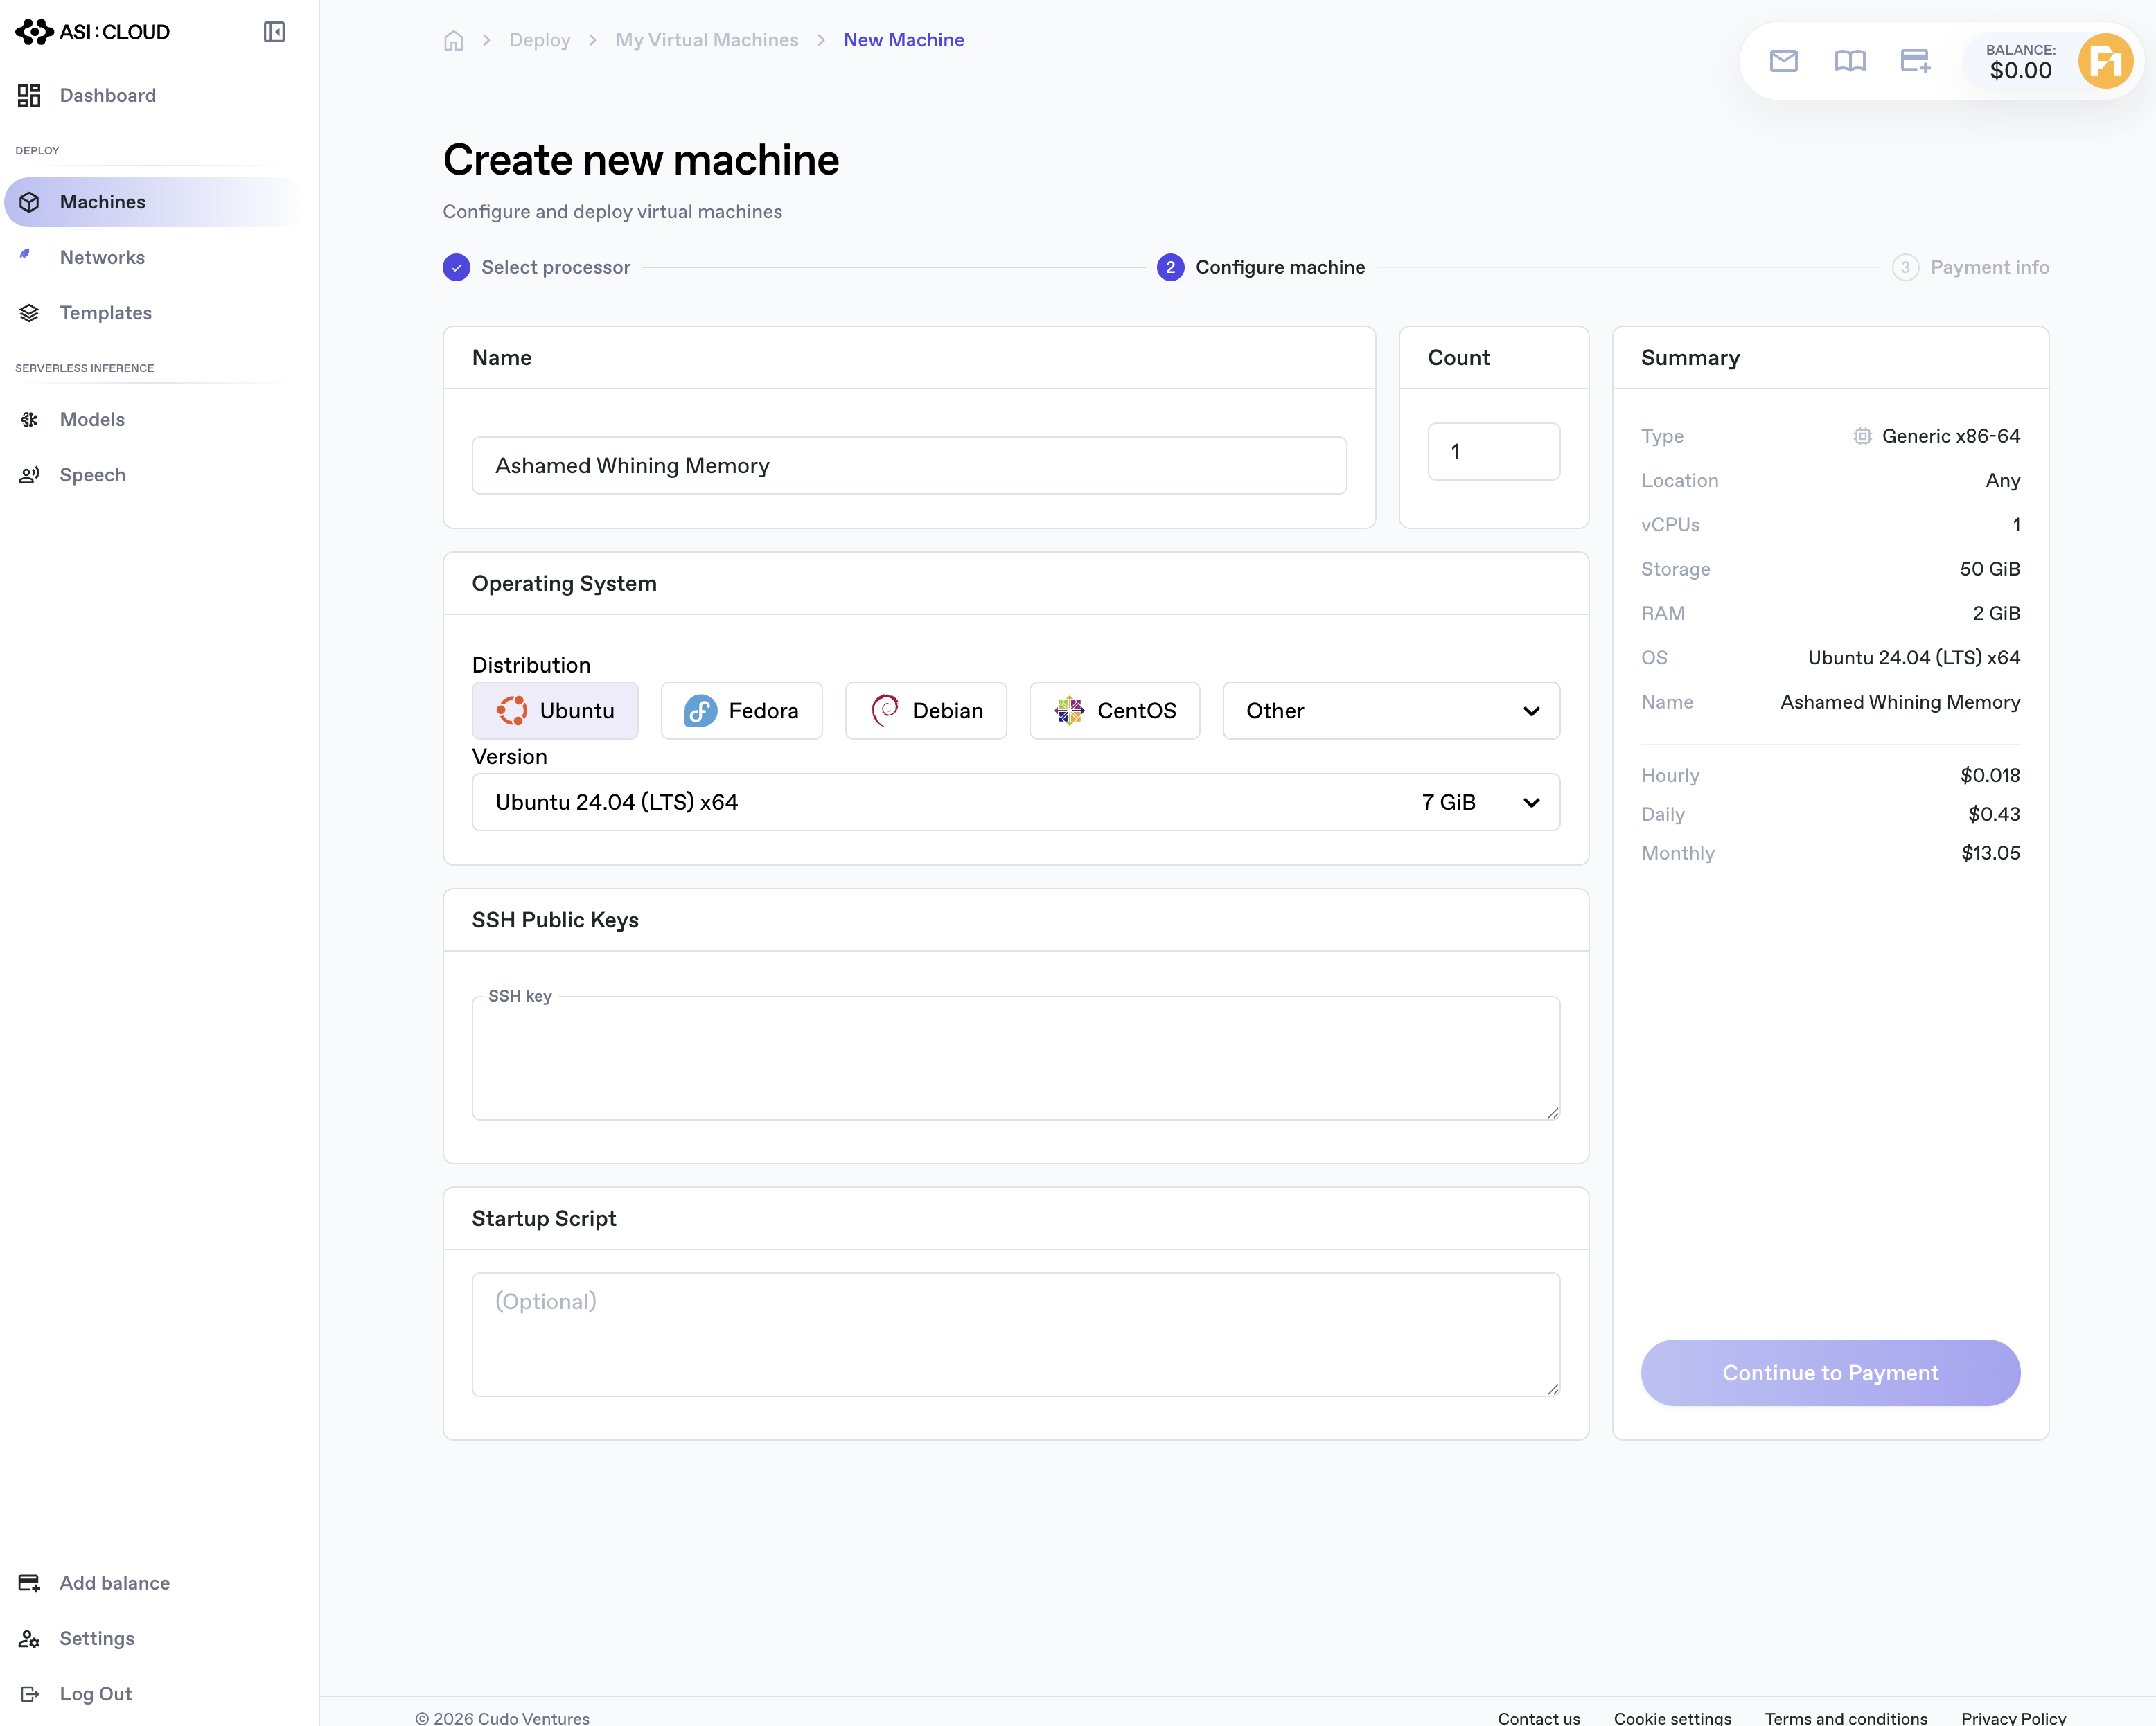
Configure the OS, identity and lifecycle of the VM. The right-hand Summary panel updates live with the cost preview.
Name & Count
- Name: pre-filled with an auto-generated handle (e.g. Drab Melted Processor); editable.
- Count: deploy multiple identical VMs from the same configuration in one go.
Operating System
Pick a Distribution (Ubuntu, Fedora, Debian, CentOS) or open the Other dropdown for additional distributions such as Rocky Linux.
The Version dropdown then lists the available images for that distribution, with the disk-image size shown on the right (e.g. Ubuntu 24.04 (LTS) x64, 7 GiB). Ubuntu also offers GPU-focused AI/ML Ready images with Docker and NVIDIA (or AMD) drivers preinstalled.
SSH Public Keys
Paste any SSH public keys that should be authorised on the new machine. You can add multiple keys, one per line.
If you don't have an SSH keypair yet, follow the Creating an SSH Key guide first.
Startup Script (optional)
Provide a cloud-init / shell script that runs on first boot to install packages, pull code or start a service automatically.
Summary panel
The right-hand panel summarises:
- Type, Location, vCPUs, Storage, RAM, OS, Name.
- Hourly, Daily and Monthly projected costs.
Click Continue to Payment when you're ready.
Step 3: Payment info
Choose how to pay for the machine.
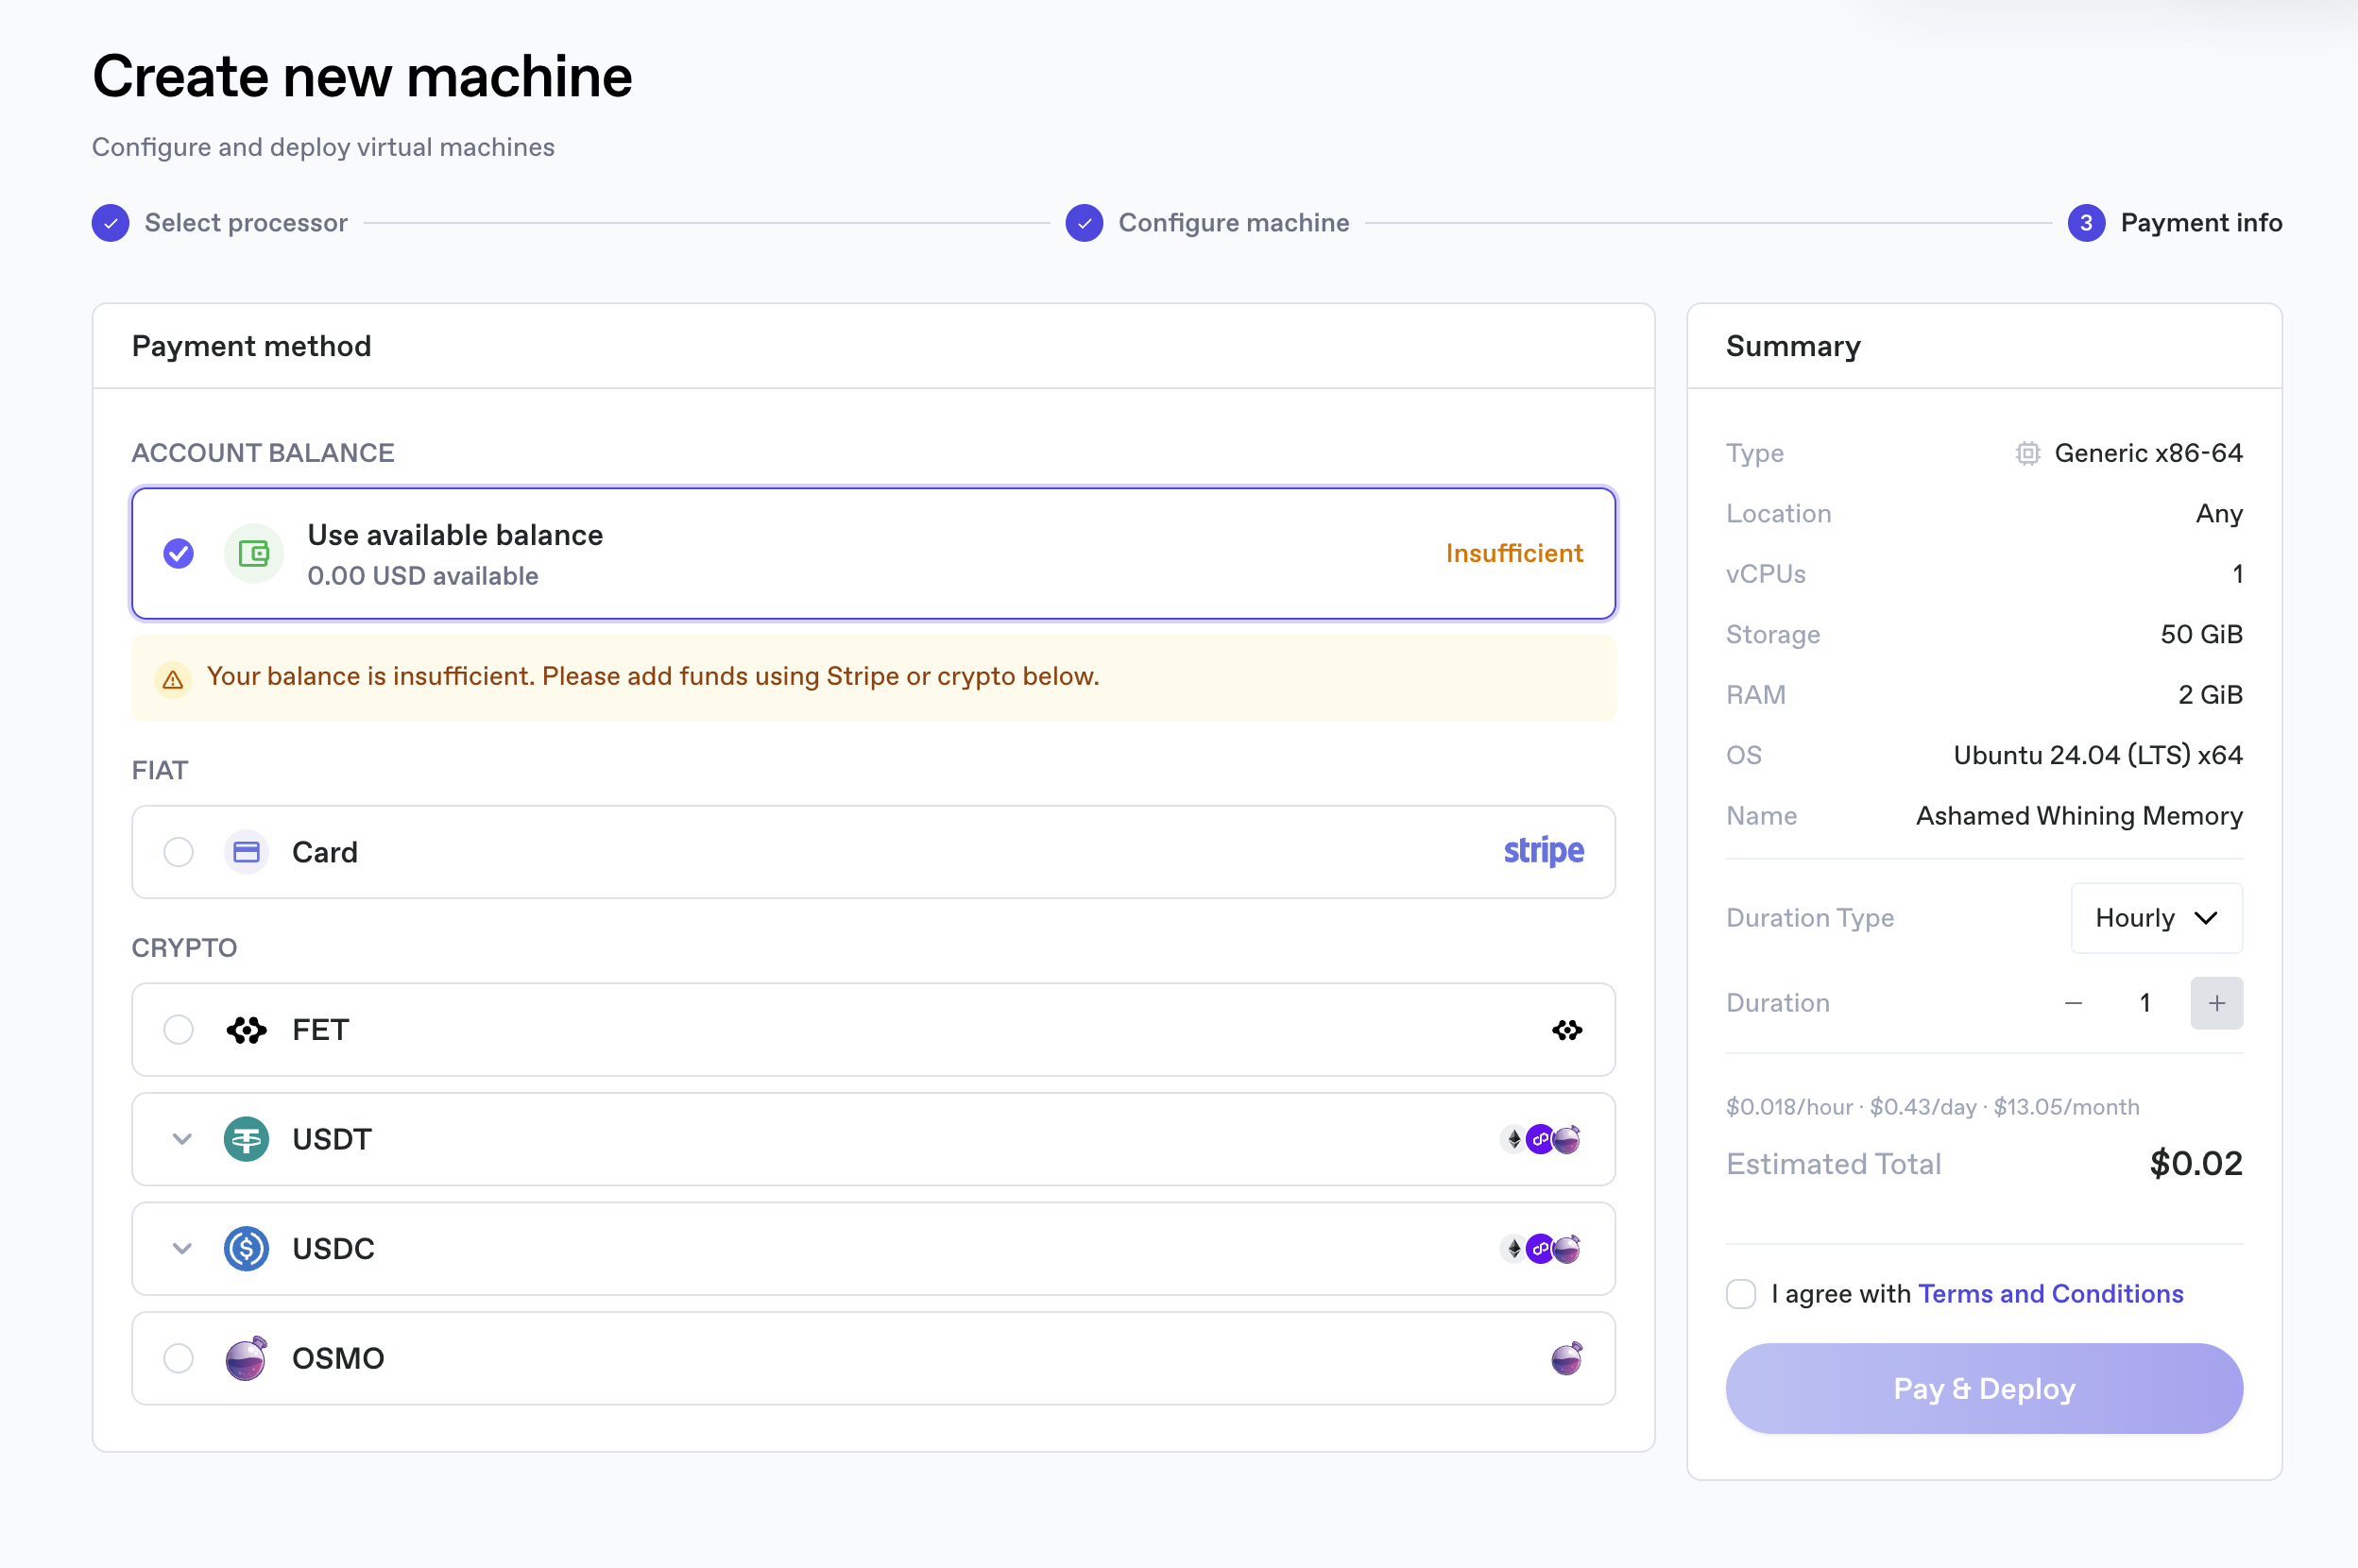
Account Balance
The first option uses your existing ASI:Cloud balance:
- Use available balance: shows the available USD amount.
- If the balance is insufficient for at least one hour of runtime, an Insufficient warning appears and you must top up via one of the options below.
Fiat
- Card: pay by credit/debit card via Stripe.
Crypto
- FET: Fetch.ai / ASI Alliance native token.
- USDT: multi-chain (Ethereum, Polygon, Osmosis).
- USDC: multi-chain (Ethereum, Polygon, Osmosis).
- OSMO: Osmosis native token.
Duration
The right-hand Summary panel includes:
- Duration Type: Hourly / Daily / Monthly.
- Duration: the number of selected units.
These controls produce the Estimated Total and, when topping up via card or crypto, determine how much credit is added to your balance.
Virtual machines on ASI:Cloud are always metered hourly; the Duration Type and Duration controls do not change the rate at which the VM is billed. They exist purely so you can size your top-up correctly (e.g. picking Monthly × 1 tops you up for ~one month of continuous runtime). Stop the machine at any time and metering stops with it.
Tick I agree with Terms and Conditions and click Pay & Deploy to provision the VM. You'll be redirected to Viewing Your Virtual Machines once the machine is created.
Please back up any critical and sensitive data that you store in a Virtual Machine, following the best-practice guidelines of VM usage.
What's next
- Viewing Your Virtual Machines: connect to your VM via SSH and manage its lifecycle.
- Adding Balance: top up by card or crypto outside the VM creation flow.